
There are a few different guides on linking your GoDaddy account with Gmail already around, but I always found them lacking to one degree or another. Here is a comprehensive guide on linking your GoDaddy email account with your Gmail account, so that you can send and receive email from your GoDaddy account via your Gmail account.
There are a few different guides on linking your GoDaddy account with Gmail already around, but I always found them lacking to one degree or another. Here is a comprehensive guide on linking your GoDaddy email account with your Gmail account, so that you can send and receive email from your GoDaddy account via your Gmail account.
Update: May 16, 2020
There may be a problem when setting up forwarding from your GoDaddy account to your Gmail account as per the ‘Bonus’ instructions at the end of this article. You may end up having a lot of your legitimate forwarded email marked as spam when it arrives in your Gmail account.
When forwarding email from your GoDaddy account (or any other email provider), you must make sure to add your GoDaddy email address as a sender (see Sending Email, steps 7-10 below). This is an indicator to Gmail that the incoming mail from that address is indeed legitimate mail, and not a spammer trying to obscure their email address.
This can be a challenge when forwarding ALL email from another domain to your Gmail account, since you’ll have to add each email address to your Gmail account as a potential sender.
See this article from Google for a more thorough explanation: Best ways to forward mail to Gmail.
And if you’re forwarding a catch-all email address to your Gmail account, you may really be setting yourself up for trouble. Catch-all email addresses collect a lot of spam, and if you’re forwarding all that spam to your Gmail account, you’re essentially teaching Gmail’s spam filter that a lot of email coming from that catch-all address is spam.
This all leads to a lot of legitimate email from your GoDaddy account being flagged as spam by your Gmail account.
Update: May 10, 2019
Another copy of this article may exist on artkenya.net. This was not an authorized reproduction and has become the subject of another post. It appears to have been removed as of today.
Update: April 29, 2015
“535 Authentication Failed” error – A solution
If you go through these instructions and are getting a ‘535 Error: Authentication Failed’ message, janeOc from the comments posted a solution from GoDaddy tech support that seems to be solving the problem:
- Log into your GoDaddy account
- Go to Email Control Center (Wordspace control center)
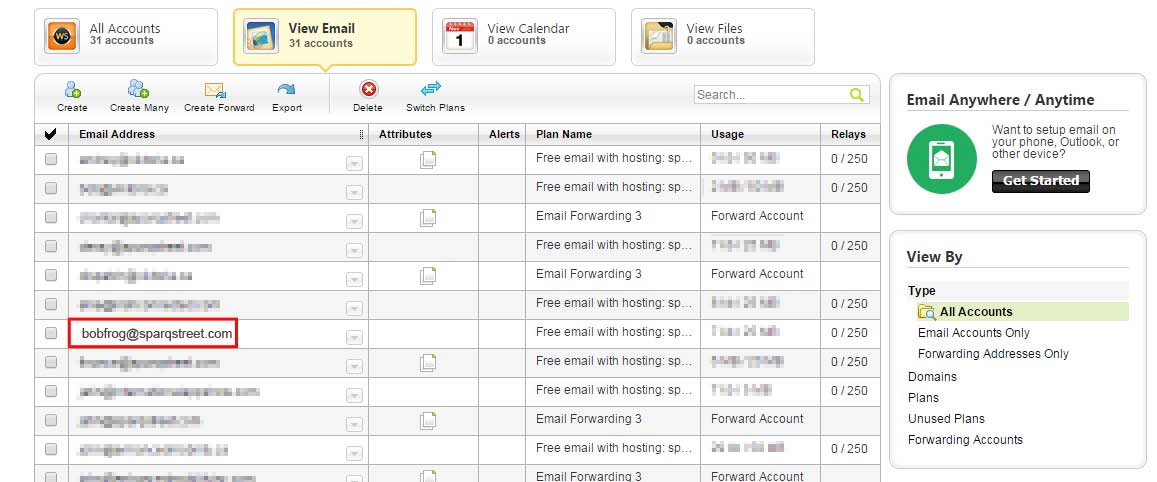
- Search for the email address. Look at the Relays column. It is probably blank. It needs to be reset.
- Click on the email account to edit it.
- Set the ‘SMTP Relays per day’ to 0 and then Save
- Set the ‘SMTP Relays per day’ back to 250 and then Save
- Wait 30 minutes.
- Go back to your Gmail > Settings > Accounts and Import section of Settings, look at the “Send Mail As” section and click “Add another email address that you own.” It should then work.
*We’re not affiliated with either Google or GoDaddy, although we use both companies’ products.
Receiving Email
Note: If time is important to you in receiving email, the Bonus tip is about email forwarding. You’ll definitely want to set that up.
- Log into your Gmail account.
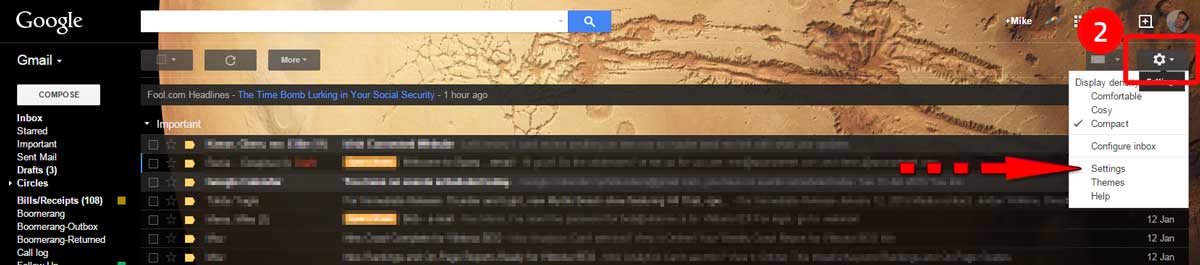
- Click on the gear at the top right, and then on Settings.

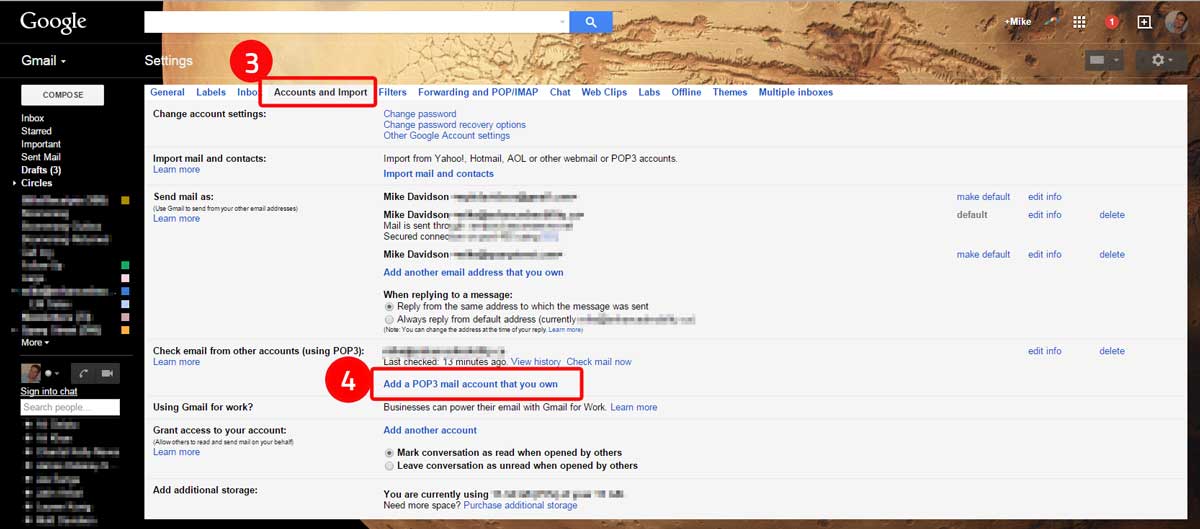
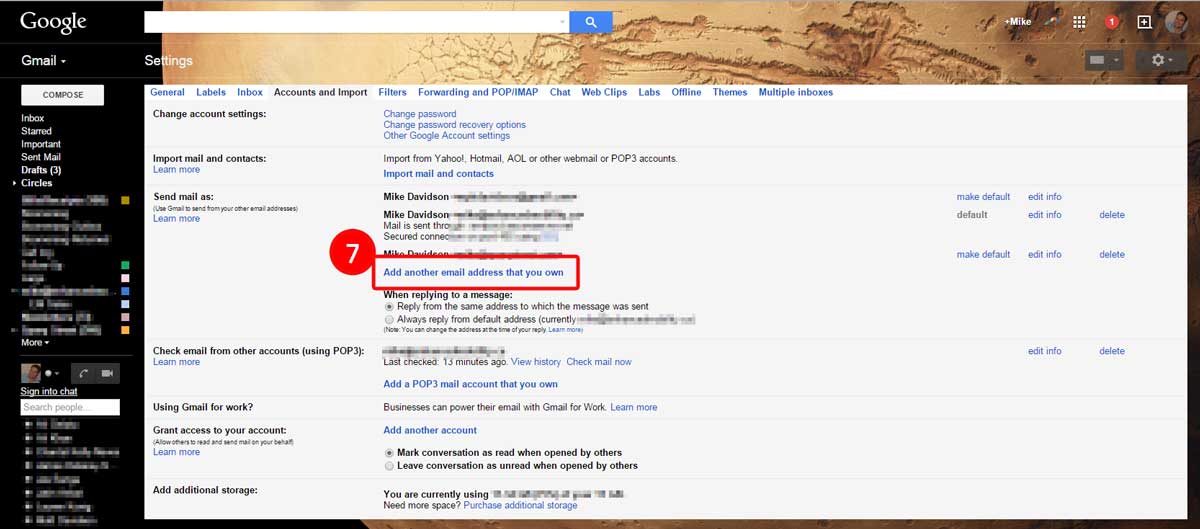
- Click on Accounts and Import.
- In the “Check email from other accounts” section, click “Add a POP3 account that you own.”

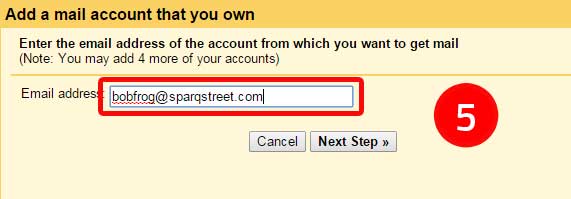
- A window will pop up. Type the email address you want to add, then click “Next Step.” In case it is not obvious, do not enter “[email protected]” in this step or any other step. Enter the email address you are linking to your Gmail account.

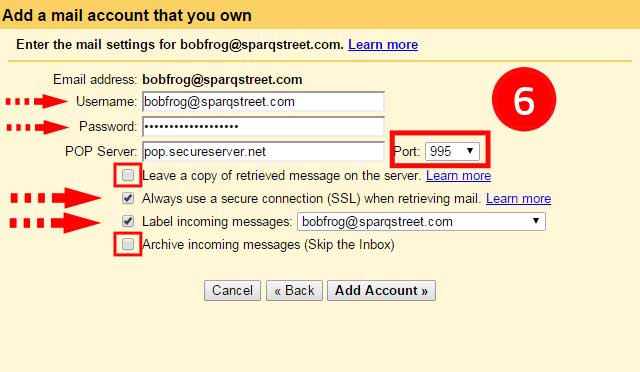
- Fill in the fields on the next page as you see them here.

- Your username is your FULL email address, including the domain (the part after the @ symbol)
- The POP server is “pop.secureserver.net”
- Important: If you’re using cPanel email, user the POP server “p3plcpnl0923.prod.phx3.secureserver.net”.
- Use port 995.
- Make sure “Leave a copy of retrieved message on the server” is UNCHECKED. If you forget to do this, you will have to manually empty your GoDaddy email account on a regular basis manually or else it will fill up.
- Check the “Always use SSL” box.
- You should check the “Label incoming message” box so you can easily identify which emails are coming from that address.
- Leave “Archive incoming messages” UNCHECKED, unless you have a good reason not to.
- Click “Add Account.”
Sending Email
- Back on the Accounts and Import section of Settings, look at the “Send Mail As” section and click “Add another email address that you own.”
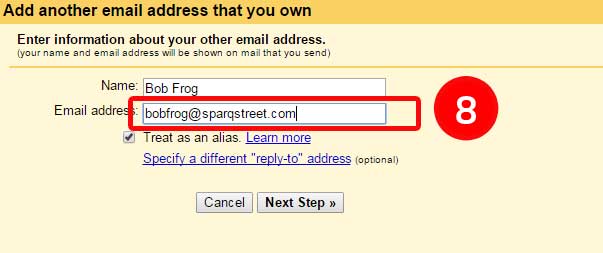
- Enter your name and email address.

- Ticking the “Treat as an alias” box tells Gmail that this address represents You, and not, say, your boss. Although some people have suggested unchecking this box because it can result in undesired behaviour, I’ve always left it checked and never had any problems.
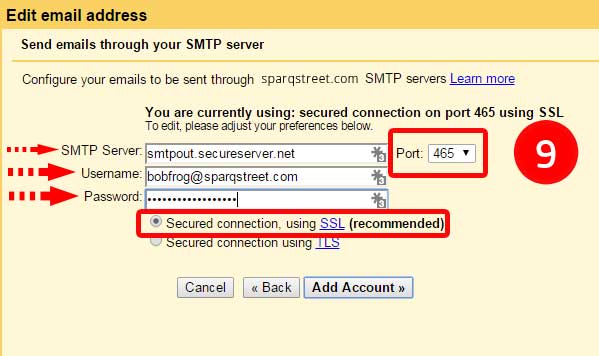
- Fill out these fields as you see here. Of course, use your own email address in place of “bobfrog@sparqstreet.”

- SMTP server is “smtpout.secureserver.net.”
- Important: If you are using cPanel email, the SMTP server will be “p3plcpnl0923.prod.phx3.secureserver.net”.
- Update: If you reside in Asia or Europe, Workspace email server names (not cPanel) will be smtpout.asia.secureserver.net and smtpout.europe.secureserver.net respectively.
- If you’re not sure, check out this knowledgebase article for instructions on how to determine which region you should use.
- User name is your ENTIRE email address. That includes your domain name (the part after the @ symbol).
- Use port 465.
- Use Secured connection using SSL.
- Click Add Account.
- SMTP server is “smtpout.secureserver.net.”
- You should receive an email confirmation to ensure that you actually do own the email address you’re adding. It’ll go to your new (GoDaddy) email address – that’s why we made sure we can receive email from this account before we set up Sending. Follow the instructions to authenticate your account – it should be as simple as clicking a link.
BONUS
Gmail only checks your GoDaddy account every hour or so… maybe longer. For some, this is no big deal. For others, a 1-2 hour delay in being notified of new email is unacceptable. If this is the case for you, here’s a solution.
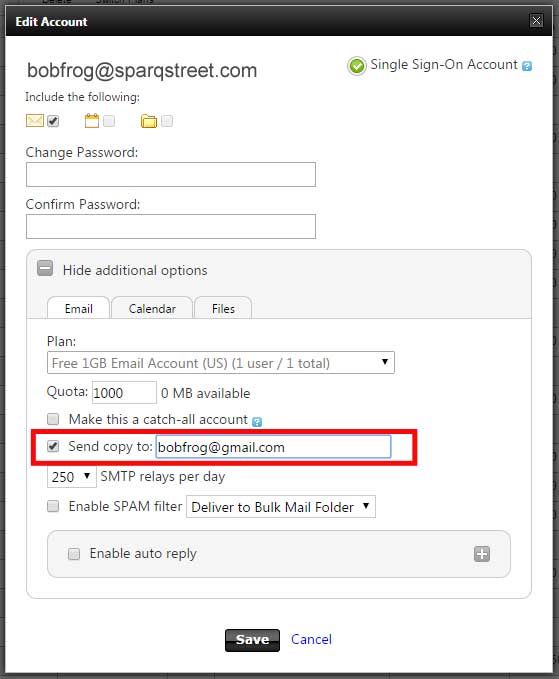
- Log into your GoDaddy email center (Wordspace Control Center).
- If you’re using cPanel email, you won’t have this option. You’ll have to set up an email forwarder instead, which I won’t get into here.
- Click on the email account you’d like to change.

- Tick the “Send copy to” and enter your Gmail address, then click save. This will automatically forward any incoming mail to your Gmail account as it arrives. Don’t worry, when Gmail actually checks your account, you won’t wind up with duplicates. It’ll just clear your GoDaddy inbox.

That’s it! Hope this helps.


I followed your instructions here exactly, and on step 9, it keeps giving me this error message ” Authentication failed. Please check your username/password.
[Server response: 535 Authentication Failed for [email protected] code(535) ]”
What can I do to fix this? I am 100% sure I’m using the correct email and password. I tried using other ports and those give a different timeout error message.
Thank you!
Hey Krys, were you able to set up your account to receive email, but not send?
I’m having the same problem…able to be forwarded messages from my godaddy email, but not able to send as them and I’m being give the same error message.
Thanks for the info. Much more helpful than our company’s IT guy!
These instructions were exactly what I’ve been doing for days, yet with no luck. I’m also receiving the 535 Authentication Failed error. I’ve seen many posts about selecting “Full time SSL” within godaddy, but that option appears to be gone now. Is there anyone out there who’s been able to make this work, or is it a total loss?
Having the same problem….please help!
Hey guys,
There are a few reasons you might be getting the 535 error, so we can try to narrow it down. Do you use Cpanel email or Workspace email? And did you recently switch from one to the other, or is this a new account?
I’m having the exact same issue. Just transferred the domain to godaddy about 2 weeks ago. I can recieve emails via pop, but when i try to set up the smtp part i get that 535 error.
I’m set up with Workspace.
I read an older post that says there used to be a way to set up something like consistant ssl on the workplace settings, but that doesn’t exist any longer.
Has anyone found a way to get around this 535 error?
Thanks this guide was so helpful! I hate how gmail changes and restricts their settings so often.
Thanks Eric! Glad you found it useful.
Here is one possible solution to the 535 Authentication Failed Error:
Simply remove the original entry for “Check mail from other accounts” and try doing the steps for “Sending Email” first (steps 7-10) before going back to steps 4-6.
We’d love to hear if this helps anyone, so drop us a line after you give it a try!
I’m able to send emails from the godaddy account but still get the same SSL error message when trying to setup the “check mail from accounts”.
I hope someone will find out how to fix this. I’ll continue to look for a solution.
Thanks
It looks like the SSL certificate isn’t good enough for gmail. having your own certificate should fix the issue. I don’t need one so I’m not sure I’ll be able to fix this.
I may just forward all emails from godaddy to gmail instead.
That didn’t work tried adding just new outgoing email but still error 535
Using workspace email…
Please help with a solution
Hey Mike – I’m having the same issue. I tried removing the original entry and everything! Any other advice?
Thanks in advance!
Kyle
Still getting the 535 Authentication Failed Error, the solution didn’t work 🙁
Thank you. It saved me a lot of time 🙂
You’re welcome! Happy you found it useful!
I am unable to set up the my GoDaddy email as a “Send email as” address. I get the following error message: Oops, we weren’t able to finish. Please verify that you have entered the exact settings provided by your other email service. Contact your other email administrator for further details.
HELP
Hey Cynthia, check to see if you added a space at the end of your email address or another field. That got me once 😉
If that doesn’t work, let me know if you’re using Cpanel or Workspace email.
I am using Workspace Email and continue to get the 535 Authentication Error when trying to setup the SMTP server. The POP3 receive server is working fine.
I was having the same issue and was able to SOLVE it by changing my Workspace email’s password and waiting 30 minutes for the “refresh” (GoDaddy’s Support lingo, not mine) to take effect.
Tried again and I was golden!
That’s great Arjun! Thanks for sharing this!
You’re the second person to report changing your GoDaddy password solved the problem. Looks like a good option to try.
I followed the steps and I’m unable to send from gmail, godaddy emails. Error message is:
Authentication failed. Please check your username/password.
[Server response: 535 Authentication Failed for [email protected] code(535) ]
Hey Mario, have a look at Arjun’s comment from April 1st. Apparently changing your GoDaddy email password and waiting 30 minutes is a viable solution. Arjun is the second person to report that fix as being valid, so it’s worth a try!
Hi. I tried changing my password. It is not working. I am still getting “Server response: 535 Authentication Failed for [email protected] code(535)”
Please help
Hi. I tried changing my password. It is not working. I am still getting the error response from the server. Please help
I had the same error message: “535 Authentication Failed…”. I called GoDaddy support and they said the issue was the SMTP relays for my email address were not set in the GoDaddy email control center. The relays had to be reset. Once reset, it worked.
To fix this issue.
1. Log into your GoDaddy account
2. Go to Email Control Center (Wordspace control center)
3. Search for the email address. Look at the Relays column. It is probably blank. It needs to be reset.
4. Click on the email account to edit it.
5. Set the ‘SMTP Relays per day’ to 0 and then Save
6. Set the ‘SMTP Relays per day’ back to 250 and then Save
7. Wait 30 minutes.
8. Go back to your Gmail > Settings > Accounts and Import section of Settings, look at the “Send Mail As” section and click “Add another email address that you own.” It should then work.
Thanks for sharing a step-by-step solution to this Jane! GoDaddy support has been pretty helpful the times I’ve had to call in, and it looks like they came through for you too.
If anyone else has a chance to try this solution, it would be helpful if you’d share the outcome here.
“I had the same error message: “535 Authentication Failed…”. I called GoDaddy support and they said the issue was the SMTP relays for my email address were not set in the GoDaddy email control center. The relays had to be reset. Once reset, it worked.
To fix this issue.
1. Log into your GoDaddy account
2. Go to Email Control Center (Wordspace control center)
3. Search for the email address. Look at the Relays column. It is probably blank. It needs to be reset.
4. Click on the email account to edit it.
5. Set the ‘SMTP Relays per day’ to 0 and then Save
6. Set the ‘SMTP Relays per day’ back to 250 and then Save
7. Wait 30 minutes.
8. Go back to your Gmail > Settings > Accounts and Import section of Settings, look at the “Send Mail As” section and click “Add another email address that you own.” It should then work.”
I WORKED ON FIXING AN IDENTICAL PROBLEM FOR DAYS
^this worked 100%^
Awesome! Thanks for the confirmation Rickie!
Will this work on cPanel email accounts? I can’t find a place to change those settings.
have problem with :
Delivery to the following recipient failed permanently:
[email protected]
Technical details of permanent failure:
Google tried to deliver your message, but it was rejected by the server for the recipient domain hnaudit.org by aspmx.l.google.com. [2607:f8b0:400d:c04::1a].
The error that the other server returned was:
550-5.1.1 The email account that you tried to reach does not exist. Please try
550-5.1.1 double-checking the recipient’s email address for typos or
550-5.1.1 unnecessary spaces. Learn more at
550 5.1.1 http://support.google.com/mail/bin/answer.py?answer=6596 j9si7430831qcf.21 – gsmtp
—– Original message —–
DKIM-Signature: v=1; a=rsa-sha256; c=relaxed/relaxed;
d=gmail.com; s=20120113;
h=mime-version:in-reply-to:references:date:message-id:subject:from:to
:content-type;
bh=7wIYc1omC7ual3qHZK+4ZyTh7HyGvS8WGadHX9eS510=;
b=KwbyAFuD7bO6G1LI3QaeQGw98tJr2h4O+AEvMEjV69lSQErnxfbuLHXoBxcUk13sJp
Go8wk2A3jCvLE6P4GQWsZ4qin4091bI1M07lzTC2+GfOlS5pqjsaFlKW0T41RRWQGiiB
g5/x7lOigWKEpCht7foBhUU+bhg3y/Q8lzwqdvsxapQyutCQTT1lWwOOlh/29Y1xxGGT
zmsLNhZN0+/00Tj5GPrDg+wsLD1/qO2gMZQZ5wfFz0LkYgSJnEZZ/Hm8pRf08eluqfOx
Vb04OgvttIuGsYB8QDLsjbH2W2XzGMOkkjWkvFf8niunMQ4NipMntdakGxF7k8yt0S4Q
peyA==
MIME-Version: 1.0
X-Received: by 10.140.42.195 with SMTP id c61mr34911993qga.94.1427628553944;
Sun, 29 Mar 2015 04:29:13 -0700 (PDT)
Received: by 10.229.185.7 with HTTP; Sun, 29 Mar 2015 04:29:13 -0700 (PDT)
In-Reply-To:
References:
Date: Sun, 29 Mar 2015 13:29:13 +0200
Message-ID:
Subject: Fwd: [FWD: test]
From: =?UTF-8?Q?Shk=C3=ABlqim_Selmani?=
To: [email protected]
Content-Type: multipart/alternative; boundary=001a113abef4d4441405126bac0b
Gracias 🙂
De nada 🙂
Oh my God, I cannot thank you enough – 7 hours I have sat trying to make this work and finally, following your instructions about resetting the SMTP Relays per day, IT WORKED!!!! Thank you soon much, I am sending you a virtual hug!!!
You’re welcome Heather! I’ll be sure to pass on the thanks to GoDaddy tech support next time I speak with them 😉 And of course janeOc for sharing in the first place.
I created a ‘free email forwarding with domain’ only (not have any email password set), but did not purchase any ’email plan’ or owned other ‘free email credit’. can I still use the ‘send email as’ function from gmail to godaddy?
Hey Howard, sorry for the delay. Have been on vacation for a while 🙂 Yes, you should be able to use that functionality with Gmail. The settings should be the same as other accounts.
Hey then what password are we suppose to use for the forwarder email ID setup on gmail? I haven’t purchased any additional email plans but have got free forwarder email Id’s with the domain I purchased. When I created forwarder email id on godaddy, there was no option to setup a password for the id.
You would use whatever password you use to log into your GoDaddy email account. You would not use your general GoDaddy account password.
I also have this issue. I have the free forwarding emails provided through godaddy and want to be able to send from my gmail while having the godaddy email address show. I have been unable to setup a “send as” because I do not have a password with my free forwarding email. There is no password so there is nothing I can enter in the field. Anyone have a work around for this? I’ve tried setting one with no luck and contacting godaddy support basically tells me to contact gmail support because they’ve provided me with everything they can…
Hey Chris,
Unfortunately you won’t be able to do this with a forwarding address. It’s not a real email address in the way that you and I think of it. You can’t send from that address, and you can’t really receive either – you can just re-direct incoming email to another address. They can be handy as an add-on address that you’ll never send email from. We used to use a forwarding address for [email protected] – incoming mail would come to that address, get forwarded to the appropriate parties, and we’d then respond from our own email address.
You’ll really need a standard email inbox to do what it sounds like you’re looking to do.
Works great for me!
Thanks a lot for the help.
You’re welcome Rodrigo! Thanks for the thanks 🙂
THANK YOU SO MUCH FOR THE BONUS! No more delay. I bow to you.
Dear Friends,
I had faced same issue after reading article many times i had done relay 0-250 but no use. Finally I login my web mail and gone mail setting
Open web mail——->tools—————>Email setup center
in email setup center you can see the Out Going SMTP
Im living in India so my SMTP is : ” smtpout.asia.secureserver.net ”
please do this if the problem persists
thank you other
Thanks for the tip Lokanath. I’ll update the article to reflect region-specific servers. Europe has it’s own server, smtpout.europe.secureserver.net.
Godaddy always has to make things difficult. I wasn’t checking the ‘always use secure connection’ checkbox which was tripping me up. Now everything is working though.
This is best far the best resource on the subject. Thanks dude!
Does this process work only with Godaddy hosting? I & 1 as my hosting site but the domain is from Godaddy. My info@——.com is setup with 1&1.
Thanks for the help.
Hey Edmond,
The principals from the instructions should apply to other shared hosting providers, although I haven’t tested that.
It would be great if you could try it with your hosting provider and let us know if the settings are compatible!
i tried the settings, i live in asia and used:
smtpout.asia.secureserver.net and tried all the port settings with the SSL option marked. My username(email) and password is correct with godaddy.
I also have the relay set up in my go daddy account 0/250
I get this error message in gmail:
Oops, we weren’t able to finish. Please verify that you have entered the exact settings provided by your other email service. Contact your other email administrator for further details.
I’ve contacted godaddy and they told me to change the port number but all of them don’t work…
Hey Carmen,
All of our accounts have relays set to 250. I’d expect that setting relays to 0 wouldn’t work.
One of the earlier comments had to do with resetting relays. This is different than changing the setting to 0.
Try changing this back to 250.
You can also try contacting GoDaddy and having them reset the relays from their end.
Be sure to let us know if it fixed the problem!
Hi i have a godadday server, mails configures of different domains are not able to receive mails from gmail but can send mails.
One domain is able to send or receive mails from gmail but other show error of delivering mails as follows
Delivery to the following recipient failed permanently:
[email protected]
Technical details of permanent failure:
Google tried to deliver your message, but it was rejected by the server for the recipient domain celebratingmumbai.com by smtp.secureserver.net. [68.178.213.37].
The error that the other server returned was:
550 5.1.1 Recipient not found.
Your instructions are great- worked for me! One question I have is whether I can respond from this email address I added via my phone (iphone)? I’m not sure how to add this email address as an option when I want to send email via phone….?
Glad we could help Amanda!
As for the iphone setup, I’m afraid I can’t help you there. I’m an Android guy 🙂
GoDaddy does have instructions here, although I can’t vouch for their accuracy or ease of use.
Dude, you are awesome! Thank you SO MUCH for these excellent instructions. I was banging my head against a wall all day yesterday. You rock.
You’re very welcome!
Thanks for the note 🙂
Very, very helpful. Thanks!
thank you so much for this – i have been trying to do this for years!
Hi I am using godaddy office 365 email address. How can set up my gmail in order to send message on behalf of the godaddy message ?
Hi Vijay,
I’m a little unclear about your question as you’ve mentioned Office 365, Gmail, and GoDaddy. I’m afraid I don’t have any experience with Office 365 anyway, so I’m probably not the best person to answer your question.
If you’d still like me to help, drop me a line via the contact form and you can hire me to find a solution for you 🙂
Hi Guys, problem 552 here, anybody on the same boat? Its killing my days..
*******************
This message was created automatically by mail delivery software.
A message that you sent could not be delivered to one or more of its
recipients. This is a permanent error. The following address(es) failed:
[email protected]
host a2nlsmtpcp-v01.shr.prod.iad2.secureserver.net [198.71.232.0]
SMTP error from remote mail server after end of data:
552 5.2.0 OjAlaB5tn8nik :: CPANEL :: Message rejected for spam or virus content ::
Please include this entire message when contacting support ::
v=2.1 cv=KsLtoTiN c=1 sm=1 tr=0 p=Ec2NenbtAAAA:20 a=FciH6MDd4asomv6AYp0a1w==:117 a=L9H7d07YOLsA:10 a=9cW_t1CCXrUA:10 a=s5jvgZ67dGcA:10 a=MKtGQD3n3ToA:10 a=ZZnuYtJkoWoA:10 a=7aQ_Q-yQQ-AA:10 a=Z7t4tLaiovoA:10 a=ywKNodEjAAAA:8 a=3j4BkbkPAAAA:8 a=JqEG_dyiAAAA:8 a=vnREMb7VAAAA:8 a=cGp1wubIkRZ4qhExoMYA:9 a=QEXdDO2ut3YA:10 a=n_eQbuGWw0UA:10 a=x8KtEvcC1ysA:10 a=AqsR8jXBYHgA:10 a=voZrjb6_8qcA:10 a=-FEs8UIgK8oA:10 a=NWVoK91CQyQA:10 a=zwvI-rEBAAAA:8 a=xA92XDsvOwfI4YqJLGIA:9 a=c75Zh-C-gPah7m4d:21 ::
100.00
Sorry Federico, no experience with that here.
Out of curiosity, are you using cPanel email or Workspace email?
What I can say is that we’re looking at moving away from GoDaddy email. We’ve been having deliverability issues almost since day one. My guess is that’s why they’re partnering with Microsoft in offering Office 365 for their higher-end email.
Looks like there are others with the same issue.
Please do let us know, however, if you find a solution to the problem that doesn’t involve leaving GoDaddy.
Thanks for your blogging!
I tried to access Godaddy workspace email all day but still not… is it need to pay for mail storage?
Hi Ed,
We’re not affiliated with GoDaddy in any way so I wouldn’t presume to speak for their service packages or policies. You’d be best to contact GoDaddy customer service and determine what services you have included in your package.
My advice would be to ensure to have an actual email account, rather than simply a forwarding address. An email account will offer you mail storage, whereas a forwarding address will not.
hi, we have a webmail login but there are showing the error “please contact customer care” i connected customer care and they created mail but it is not showing on workspace email.
Hi Salman,
I’m afraid I can’t offer much in the way of assistance here. It sounds like something you’d need to address with their technical support people.
It may be of some relevance that GoDaddy is no longer offering their Workspace email to new users. They haven’t shut down the service yet, but I suspect they may not be dedicating many resources to maintaining that platform going forward. Just a guess, though.
In August 2014, Go Daddy made an update that no longer allows replying as/sending as your domain email. If you set this all up PRIOR to that update your account works fine. The only workaround (that I know of) for new accounts is to set up your reply/send as through google Apps for Work which is $5/month. It was a big bummer. =(
I already did this and I am sending emails from Gmail. But emails are not properly authenticated.
DKIM signed, SPF authenticated ?
DKIM and SPF will help improve email delivery rates and give you a bit more credibility with email recipients. You’ll need to set those up in your DNS. We’ve recently moved our email to Zoho and they have a pretty good guide on how to set up DKIM and SPF.
Do you mean I cannot set up from GoDaddy to Gmail anymore? based on #36.
I don’t think #36 is relevant to what we’re doing here. We’re using Gmail as an email client, similar to Outlook, Thunderbird, etc. I don’t see GoDaddy forcing users to use their web client.
Thank you so much for this!
You’re quite welcome Mariana 🙂 We’re really quite happy people such as yourself are finding it useful!
4/12/16: ~ 9:50am CST
**** URGENT HELP HERE ….
OK guys … my head is about spin off on this email hell I am in.
a) was on BlueHost: they went from A to F on many levels, time to move on NOW. Got to move. For my small COMPANY, not personal fun time.
b) moving NOW to Godaddy, where I thought my company would never land years ago. All seemed perfect fit UNTIL E-MAIL HELL (transition) began. Still want to go to Godaddy. Impressive except for email issue.
1. I currently use Gmail as my hub for 4 outbound/inbound different email accounts. Different names. BlueHost has a specific page explaining how to use Gmail for email. TSL/SSL … got it set up. Works.
2. Godaddy not a fan of this. Not a fan of working w/ Gmail.
3. I may LATER use Microsoft 360 from Godaddy, but not right now. Includeing their email.
***** QUESTIONS:
a) can I just use same set up configuration BhueHost used for Gmail set up … BUT sub Godaddy name where applicable?
b) does Google Works (?) have a solution here? I do not use Google Docs but keep hearing it is a solution.
Lastly, my Tahoe was hit by an 18-wheeler going 65mph to my 15mph. I am will home bound recuperating for 8 weeks. Working from only, but painful. Need fast resolution to THIS E-MAIL ISSUE to move away from BlueHost ASAP. And over to Godaddy NOW.
Anyone that can offer assistance. I personally appreciate.
Scarlett
s*********@gmail.com
Hey when I try to set it up as “Send mail through your SMTP server” I follow everything but it gives me “Your other email provider is responding too slowly. Please try again later, or contact the administrator of your other domain for further information.” anything I can do?
The only thing I can suggest is checking all the settings and making sure they’re exactly the same as in the post. Be sure you’re using the appropriate settings for either cPanel or Workspace. Otherwise, feel free to shoot us an email and we can chat about troubleshooting for you.
Thank you so much for this, worked like a charm.
This worked perfectly for me. Thanks very much. I did have to wait a couple of hours for Google to update the setting allowing sending of mail using outside SMTP servers but it’s fine now.
i try to use outlook 2016 to set up the godaddy’s workspace webmail…i follow the email setup instruction to set up IMAP and SMTP..but the password confirmation page keep popping up while using smtp server to sending out the email. in my godaddy’s webmail, there is no any icon to change the relay (my relay is 0/-250)..i also try to change the password but still can’t solve this problem…Can someone tell me how to solve this problem??
Hey Titi,
My thoughts without actually having a look into the system would be a wrong username or password. Be sure you’re using the password for that email account and not your GoDaddy account. Also be sure that your username is your entire email address, including everything after the “@”.
If you’d like us to troubleshoot for you, feel free to shoot us an email!
Hey Mike,
It’s all working great. Thanks for the advice. I am unable to reply directly to emails through my godaddy email address. It goes directly from my gmail account. please help.
Thanks
Sean
ha just figured it out. so silly. cheers
Awesome Sean! Glad to hear it 🙂
Thanks so much man! I design websites and have struggled with providing my new clients with this service. Changing the relays to zero and back as well as the password did it! Cheers!!
Glad it helped you Paul! I’m stoked that other commenters (like janeOc with the relay reset) have contributed so much to the article that it’s become a solid resource. Cheers!
Nice tutorial, thanks for creating this.
You’re welcome JD! Thanks for leaving a comment 🙂
Awesome post.
Mike,
Great information. It sounds like you have the solution, but where do you reset the relay on cPanel email?
Hey Richard, I’ve never had to reset the relay on my account but near as I can tell you’ll have to call GoDaddy support in order to do that. I don’t think it’s something that can be done from the user’s side.
Good luck!
Great post. I read your reply that Gmail “send as” alias wouldn’t work on Go Daddy email forwarders (it’s workspace mail, IIRC). But I had it working fine up until two weeks ago, when something changed (not sure where).
I now get this error trying to send email out as my alias using Gmail. Any thoughts?
-Anita
Technical details of permanent failure:
Google tried to deliver your message, but it was rejected by the relay smtp.gmail.com [74.125.69.108].
The error that the other server returned was:
535-5.7.8 Username and Password not accepted. Learn more at
535 5.7.8 https://support.google.com/mail/answer/14257 v11sm667249iod.43 – gsmtp
Hey Anita, every time I’ve seen a “Username and Password Not Accepted” message, it’s been just that. Try resetting your GoDaddy email password so you’re 100% sure what it is, then enter that password into the appropriate fields in Gmail’s settings.
Also have you tried turning off the Alias setting in Gmail? I haven’t found it to be a particularly critical option, and some people have reported problems when having it turned on.
If neither of these help, check out some of these links:
Source: https://productforums.google.com/forum/#!msg/gmail/Xbz9Lps8ZEA/3x_8LBe6Zv4J
Awesome post – super helpful! worked like a charm – especially forward a copy hack!
Eureka! Nothing else worked. Thank you!
Authentication failed. Please check your username/password.
[Server response: 535 Authentication Failed for [email protected] code(535) ]
Mad Props! This guide is really in depth and informative. Thanks!
Hey Tyler thanks for the love. Glad you liked it!
If anyone is interested, Tyler put together a massive How-To guide for about 10 different common tasks on GoDaddy’s platform. It’s huge, and well-documented with plenty of screenshots. Worth checking out: https://www.tytonmedia.com/blog/monstrous-godaddy-how-to-guide/
This tutorial was immensely helpful and saved me tons of time. The fact that you listed the servers and the ports for incoming and outgoing mail was invaluable. Thank you so much for providing such a valuable service. It was quick and easy with the step by step instructions.
Thanks for taking the time to comment Catherine, and for giving such good feedback. Glad we could help!
I never reply to these blogs, but this was so helpful!!! Thank You. Now I just need to figure out how to see my mail in GMail. 🙂
Glad we could help Warren! And yes… getting my mail in Gmail would vastly improve my disposition, especially around tax time.
One bottle of Whisky and 3 DAYS LATER I found this post!! Thank you ALL for your tutorials, comments & help. My client thinks I am a genius 🙂
This is my favourite. You made my night. Thank you!
Hi Mike,
Thank you for this post. Unfortunately when trying this I am getting an error message saying “Server denied POP3 access for the given username and password.”
Server returned error: “temporary error”
I have tried my gmail password and go daddy password. I tried changing the go daddy password and attempting that as well but no luck. Do you have any suggestions?
The only thing that comes to mind is to check which password you’re using. The password you enter into Gmail in steps 6 and 9 is the username and password for a given email account, not the username and password for your GoDaddy account.
If you’re definitely using the Email account password, then I’d check to see if you’re able to access the email account directly with that username and password. There could be an issue on GoDaddy’s side, so it might be worth contacting them to see if there’s a problem.
Thanks a lot, much appreciated!!
Be sure to use the GoDaddy EMAIL pw and server info, not your general GoDaddy info. Login to Office 365 (that’s what GoDaddy uses for email) with your email address and EMAIL pw, then: gear icon –> settings –> mail –> POP and IMAP to see your server and port settings. You might be abel to directly access it at https://outlook.office365.com/owa/?path=/options/popandimap. Took me a while to figure this out…
Yes, changing the GoDaddy webmail password worked for me. Didn’t even have to wait 30 mins. Thanks very much!
worked like a charm. thanks a million. go daddy has an awful UI
I spent a lot of time to locate something like this
Thank You for this.
Still having this “Bug” in 2023.
My guess is GoDaddy does not want people to use Gmail.
Rather they confound the process so people will give up and pay for their Microsoft Email Service.
Sad. Sad. Sad.
Thanks Billy G.
Hope you are enjoying your Billions….not.
After several head-banging attempts, I finally figured out the SMTP server setting was incorrect.
Make sure it is correct.